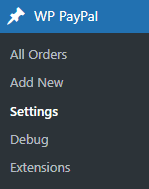
Once you have installed the Payment Button for PayPal plugin (also known as WP PayPal), you will be able to access the settings by navigating to “WP PayPal -> Settings”.
General Settings
In the general settings area, you will need to configure some options related to your PayPal merchant account.
PayPal Checkout Settings
These settings apply to the “[wp_paypal_product]” and “[wp_paypal_checkout]” shortcodes. It uses PayPal Checkout payment method to add smart payment buttons to your website. To use PayPal Checkout, REST API credentials are required. To Generate REST API credentials for the sandbox and live environments:
- Log in to the Developer Dashboard with your PayPal account credentials.
- On My Apps & Credentials, use the toggle to switch between live and sandbox testing apps (If you are creating a Sandbox app, you will also need to select a test business account that will act as the API caller).
- Navigate to the REST API apps section and click Create App.
- Type a name for your app and click Create App. The app details page opens and displays your credentials.
- Copy and save the client ID and secret for your app.
- Review your app details and save your app.
Once you have the Client ID and Secret Key you can enter it in the plugin settings.
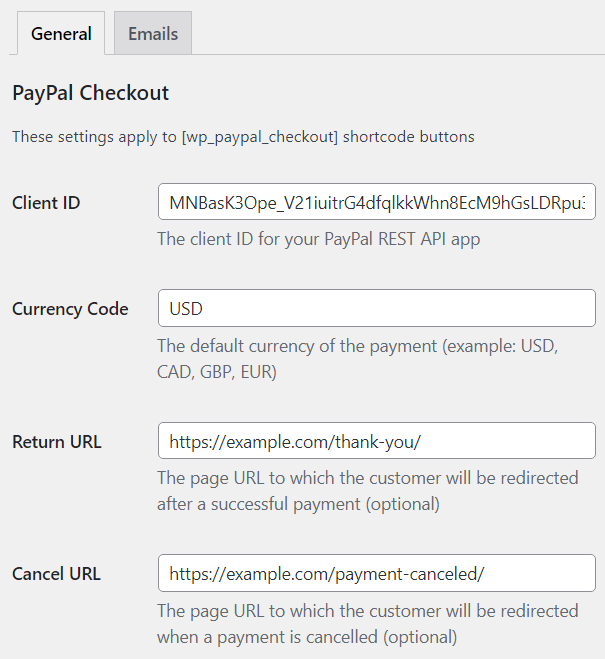
You also need to configure the following options.
Currency Code: The default currency of the payment
Return URL: The URL to which customers will be redirected after payments.
Cancel URL: The URL to which customers will be redirected when payments are cancelled.
Checkout Page URL: The URL of the page where PayPal checkout options will appear.
Enabled Funding Sources: Funding sources that you wish to display as buttons at checkout. This is not required as the eligibility is determined automatically. However, this field can be used to ensure a funding source is always rendered, if eligible.
You can enter one or more sources in comma-separated format. Here are the supported values:
| Funding Source | Description |
|---|---|
| card | Credit or debit cards |
| credit | PayPal Credit (US, UK) |
| paylater | Pay Later (US, UK), Pay in 4 (AU), 4X PayPal (France), Später Bezahlen (Germany) |
| bancontact | Bancontact |
| blik | BLIK |
| eps | eps |
| giropay | giropay |
| ideal | iDEAL |
| mercadopago | Mercado Pago |
| mybank | MyBank |
| p24 | Przelewy24 |
| sepa | SEPA-Lastschrift |
| sofort | Sofort |
| venmo | Venmo |
Disabled Funding Sources: Funding sources that you do not wish to display as buttons at checkout. You can enter one or more sources in comma-separated format. Here are the supported values:
| Funding Source | Description |
|---|---|
| card | Credit or debit cards |
| credit | PayPal Credit (US, UK) |
| paylater | Pay Later (US, UK), Pay in 4 (AU), 4X PayPal (France), Später Bezahlen (Germany) |
| bancontact | Bancontact |
| blik | BLIK |
| eps | eps |
| giropay | giropay |
| ideal | iDEAL |
| mercadopago | Mercado Pago |
| mybank | MyBank |
| p24 | Przelewy24 |
| sepa | SEPA-Lastschrift |
| sofort | Sofort |
| venmo | Venmo |
Email Settings
In the email settings area, you can choose to configure some email related settings.
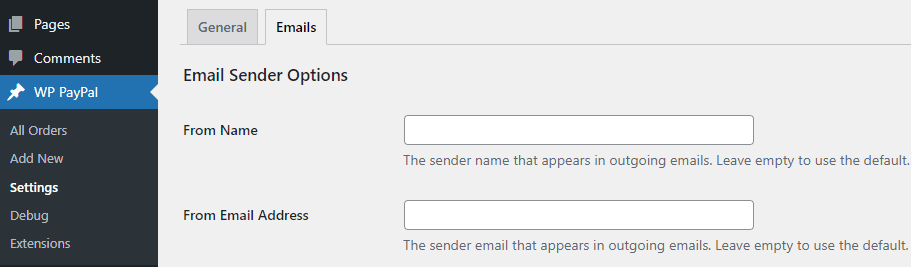
Email Sender Options
In this section, you can specify a From Name and From Email Address that will be used by the WP PayPal plugin when sending an email. You can leave them empty to use the default.
Purchase Receipt Email
WP PayPal plugin allows you to send a purchase receipt email to the customer after completion of a successful purchase. By default, this feature is disabled. In order to use this feature, you need to enable it in the settings.
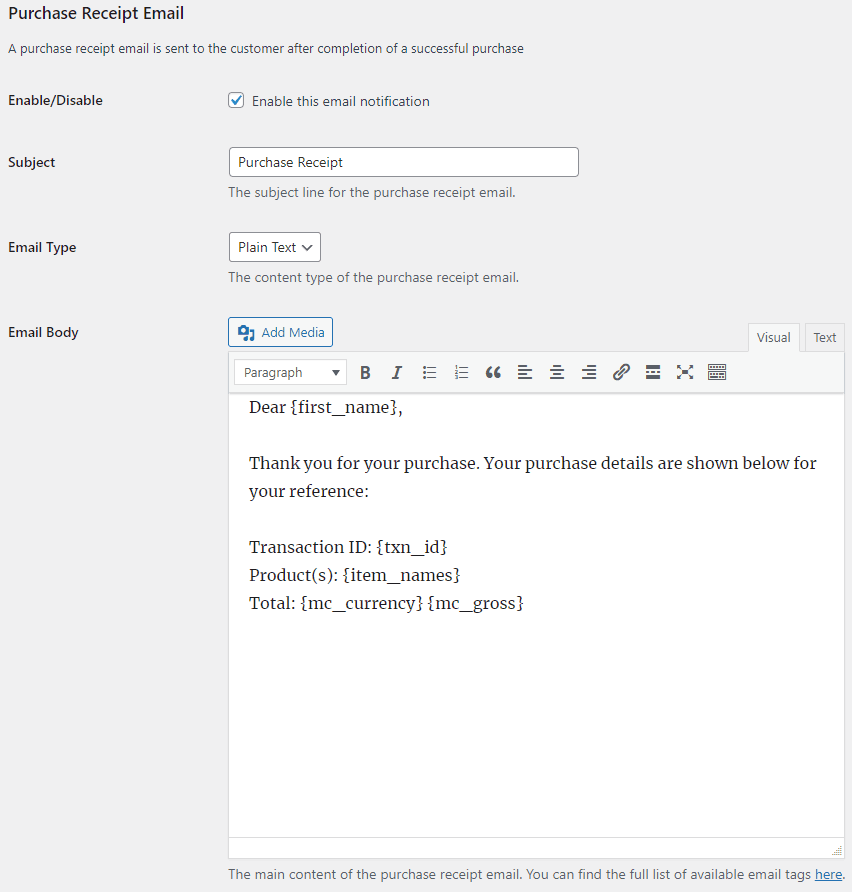
You can customize the following options in the purchase receipt email,
- Purchase Receipt Email Subject: The subject line for the purchase receipt email. You can use various tags in the email subject to dynamically change its content when it is sent.
- Purchase Receipt Email Type: The content type of the purchase receipt email (Plain Text/HTML).
- Purchase Receipt Email Body: The main content of the purchase receipt email. You can use various tags in the email body to dynamically change its content when it is sent.
Sale Notification Email
WP PayPal plugin can send a sale notification email to your chosen recipient after completion of a successful purchase. By default, this feature is disabled. In order to use this feature, you need to enable it in the settings.
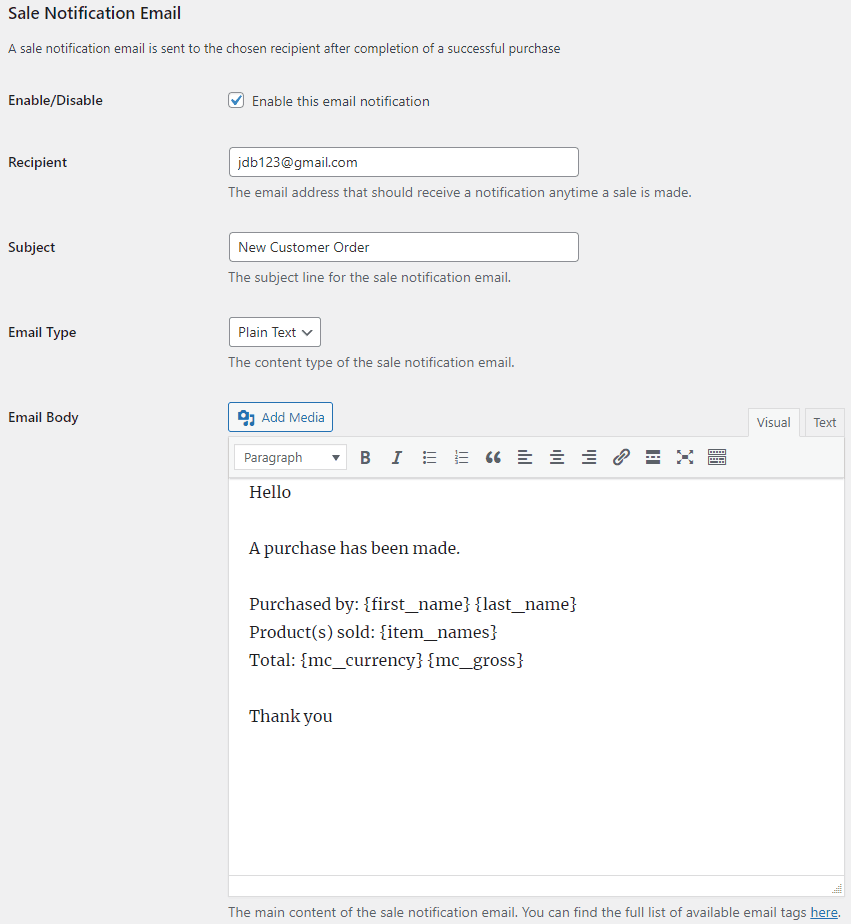
You can customize the following options in the sale notification email,
- Sale Notification Email Recipient: The email address that should receive a notification anytime a sale is made.
- Sale Notification Email Subject: The subject line for the sale notification email. You can use various tags in the email subject to dynamically change its content when it is sent.
- Sale Notification Email Type: The content type of the sale notification email (Plain Text/HTML).
- Sale Notification Email Body: The main content of the sale notification email. You can use various tags in the email body to dynamically change its content when it is sent.
Email Tags
The following email tags can be used in the email subject/body to dynamically change its content when an email is sent,
{first_name} – The customer’s first name.
{last_name} – The customer’s last name.
{txn_id} – The unique transaction ID for this purchase.
{product_name} – The name of the product purchased.
{item_names} – The name(s) of the product purchased.
{mc_currency} – The currency code used to make the payment.
{mc_gross} – The full amount of the customer’s payment.
{payer_email} – The customer’s email address.
{custom} – A pass-through custom variable for your own tracking purposes.
{shipping_address} – The customer’s shipping address.
{variation} – The variation of the product purchased.
{threedigitdiffrandnum} – A random 3 digit number. The generated numbers will be unique if the tag occurs multiple times in a single email message.