SMTP Mailer is the easiest SMTP plugin for WordPress. It allows you to configure an SMTP server to send email from your website. SMTP Mailer enhances the default WordPress mail (“wp_mail”) function by letting you connect to a remote SMPT server to send an email instead of doing it from your web server. This reduces heavy load from your server and increases email deliverability.

SMTP Mailer Installation
- Go to Plugins->Add New Plugin from your WordPress admin dashboard
- Search for SMTP Mailer naa986
- Click Install once you have found it
The plugin can also be downloaded from here: https://wordpress.org/plugins/smtp-mailer/. For a manual installation go to Plugins > Add New Plugin > Upload Plugin and select the zip file that you downloaded.
SMTP Mailer Settings
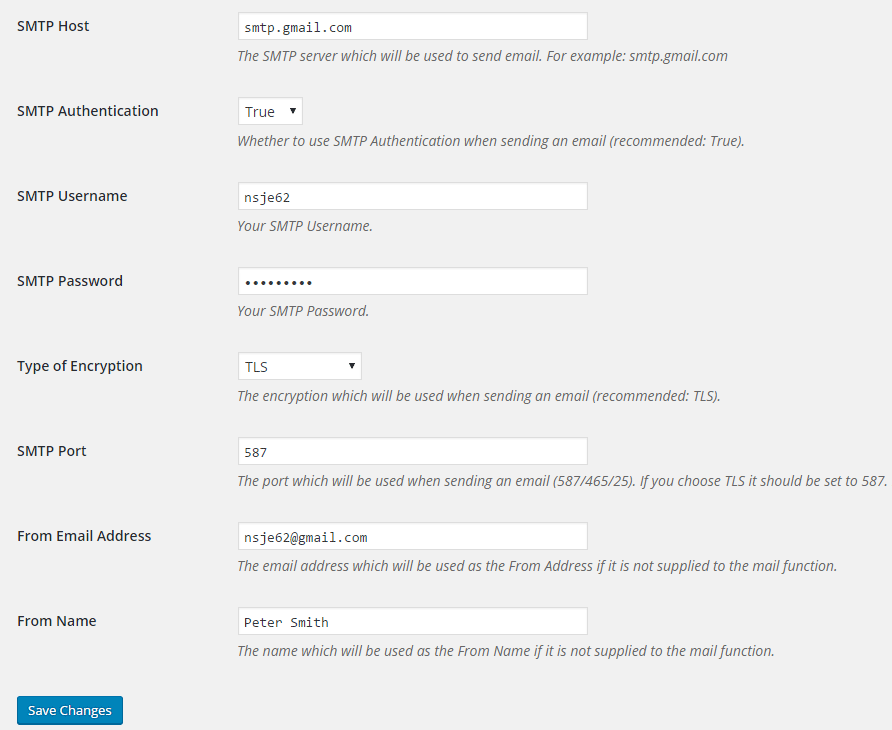
You will need to configure your SMTP server related information in order to send email from your website. In order to access the settings menu go to “Settings > SMTP Mailer > General” from your admin dashboard.
The settings menu comes with four separate tabs – General Settings, Test Email, Server Info, Add-ons and Advanced.
General Settings

SMTP Host
Your outgoing mail server which will be used for sending email (e.g. smtp.gmail.com).
SMTP Authentication
Enable/Disable SMTP authentication when sending an email (Supported values: True/False).
SMTP Username
The username to connect to your SMTP server. You will need to provide a username if you enable “SMTP Authentication”.
SMTP Password
The password to connect to your SMTP server. You will need to provide a password if you enable “SMTP Authentication”.
Type of Encryption
The encryption which will be used for sending an email (Supported values: TLS/SSL/No Encryption. TLS is recommended).
SMTP Port
The port which will be used when sending an email (587/465/25). If you choose TLS the port should be set to 587. For SSL use port 465 instead.
From Email Address
The email address which is be used as the From Address if it is not supplied to the mail function.
From Name
The name which will be used as the From Name if it is not supplied to the mail function.
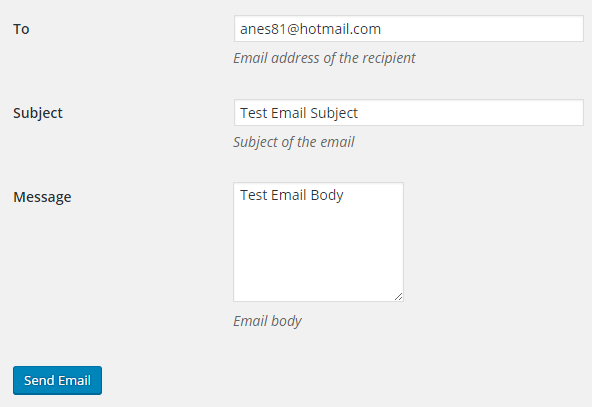
Test Email
“Test Email” menu allows you to test the functionality of the plugin after you have configured everything.

Server Info
“Server Info” menu displays some technical information regarding your server. This is very useful for troubleshooting.
Outgoing Mail Server Configurations
Here are the settings for all the popular outgoing mail (SMTP) servers.
Bluehost SMTP
For a domain name example.com, We were able to send email messages from Bluehost using the following configurations:
- SMTP Host: mail.example.com
- SMTP Authentication: True
- SMTP Username: Your domain email (e.g. support@example.com)
- SMTP Password: The password that you use to access this email account
- Type of Encryption: SSL
- SMTP Port: 465
Brevo SMTP (formerly Sendinblue)
- SMTP Host: smtp-relay.sendinblue.com
- SMTP Authentication: True
- SMTP Username: Your login email (can found be under SMTP & API > SMTP menu)
- SMTP Password: Your smtp master password (can found be under SMTP & API > SMTP menu)
- Type of Encryption: TLS
- SMTP Port: 587
Gmail SMTP
In order to connect to the Gmail smtp server with a username and password, the “allow less secure apps” option needs to be enabled in your Gmail account. Unfortunately this option is no longer available. If you wish to use Gmail SMTP you may want to take a look at my Gmail SMTP plugin which uses a different authentication method.
SMTP Mailer Add-ons
SMTP Mailer plugin comes with add-ons that you can use to enhance its functionality on your website.
Reply-To
Reply-To add-on lets you set a reply-to address for all outgoing email messages.
Email Logger
Email Logger add-on lets you log and view all email messages sent by SMTP Mailer.
Get All SMTP Mailer Add-ons
* Reply-To
* Email Logger
License: Unlimited Websites
Note:
* Do not purchase before setting up the core plugin first. The add-on is not at fault if the core plugin does not work on your website.
* Do not purchase if you are not sure about a feature, contact us instead.
* Do not purchase to ask for more features or make the product work in a certain way.

Is anyone using this successfully with PHP version: 7.4.20?
I can enter settings on the general tab, and view the ‘server info’ tab, but when I try to send a test email I the page hangs with a blank screen and then times out, no progress or debugging info is visible.
Running this on a VULTR one-click wordpress VPS
@Seth, Do you see any error log on the server?
no but I figured out the issue. The old IP address for the mail server’s hostname was still cached in my VPS providers DNS servers. So it was hanging trying to make contact to a non-existent mail server, however I was still not getting any feedback via the plugin’s ‘Test Email’ tab, just a blank screen.
Once I resolved the name resolution issue, it worked and I can see output on the ‘Test Email’ tab after sending.
Does this work with Zohomail
@Haroon, It does. I have tested it.
SMTP Error: Could not authenticate.
I’m not succeeding, I lowered the security level
can you help me?
We have WordPress deployed on Azure and having a really hard time getting it to connect to our SMTP server, which has been configured to allow connections from Azure IP linked to the WordPress site.
SMTP ERROR: Failed to connect to server: A connection attempt failed because the connected party did not properly respond after a period of time, or established connection failed because connected host has failed to respond. (10060). SMTP Error: Could not connect to SMTP host.
We are trying with o365 for mail integration, but its failing with error : SMTP ERROR: Password command failed: 535 5.7.139 Authentication unsuccessful, the user credentials were incorrect.
And we are sure that credentials are working and we are able to login with the same directly thru outlook.
I believe o365 requires that you create an “app password” for the website which is different from your normal email password. I would be interested to know if this will work with SMTP Mailer. Most other WP smtp plugins require a pro version to handle o365 connections
@Rodf, We can’t confirm unfortunately. This plugin is not for a specific SMTP provider.
Dear, I love the plugins, it works super well, I would like them to add the log section. thank you
not working with gmail SMTP? I keep trying, not succeeded
@awal, The plugin does not claim that it works with Gmail SMTP. Please check the Gmail SMTP section for more information.
Is there a way to display a log file for sent e-mails or add it as an option?
@Martin, You can install a separate plugin that will log all outgoing email messages.
How to check the password of the email? I cant find it in database and I cannot change it in my hosting… This is my last hope, please help me…
Just leaving this for the next person trying to connect to Office365 with this. You need to activate SMTP Auth in Microsoft 365 admin center and go to Users > Active users.
Hi,
can i download the previous version of smtp mailer plugin (1.1.14)?
Thanks!
BR,
L
@Tóth, Is there a reason why you wish to install the previous version?
Hello,
Is your smtp mailer compatible with Contact Form 7 ?
Because when I click on submit in my form page, there is nothing.
Thanks 🙂
@Husky, SMTP Mailer is compatible with any plugin (including Contact Form 7) that uses “wp_mail” to send email messages. However, It doesn’t do anything with the submit button in Contact Form 7. This is a separate issue that has got nothing to do with our plugin.
Does it work with spacemail (spaceship.com)?
And in which form to write SMTP Host?
@Tria, We can’t confirm this unfortunately.
Using this to send from a contact form (WP Forms). The person it’s sent to has a Hotmail account. The emails get sent but end up in her spam folder with a message something like “unable to verify that message came from sender”. I also tried a test message to another Hotmail account with the same result. Interestingly, I sent one to my own Gmail address and although it “succeeded” according to the log, it never came in at all! It’s possible that emails from my hosting service where the site and SMTP server are get blocked for some reason out of my control. Any thoughts?
@Doug, It’s possible. Have you tried these steps using the “Test Email” option in the plugin?
Still working?
@Hoa, The plugin is still functional.
Just installed this plugin, set the “SMTP Host” field to the hostname of our SMTP server
SMTP Authentication: false (as the web server is on one our own IPs)
Type of encryption: TLS
SMTP Port: 587
Tried sending a test mail but this fails with the following:
2025-07-31 13:08:35 Connection: opening to smtp.example.com:587, timeout=300, options=array()
2025-07-31 13:08:35 Connection failed. Error #2: stream_socket_client(): php_network_getaddresses: getaddrinfo for smtp.example.com failed: Name or service not known [/www/vhost/docs/wp-includes/PHPMailer/SMTP.php line 412]
2025-07-31 13:08:35 Connection failed. Error #2: stream_socket_client(): Unable to connect to smtp.example.com:587 (php_network_getaddresses: getaddrinfo for smtp.example.com failed: Name or service not known) [/www/vhost/docs/wp-includes/PHPMailer/SMTP.php line 412]
2025-07-31 13:08:35 SMTP ERROR: Failed to connect to server: php_network_getaddresses: getaddrinfo for smtp.example.com failed: Name or service not known (0)
SMTP Error: Could not connect to SMTP host. Failed to connect to server
No idea why it’s trying to resolve the SMTP Host as “smtp.example.com” – that’s certainly not what I entered!
@Chris, There is no code in the plugin to connect to example.com
The above is copy/pasted from the test email output, I would upload a screenshot of the config but there doesn’t seem to be an option here for that, but I can assure you that the SMTP Host does NOT have “example” anywhere in it.
@Chris, We are not saying you configured it wrong. We simply reported our findings after investigating the code. There must be something that is redirecting the connection to example.com.
It would seem that the plugin is caching the setup data somewhere, can you tell me where this is please? Even if I deactivate then delete the plugin, when I reinstall it, the previous config is there! The plugin should ideally delete all it’s own data when removed, but seems it is not. I think this is where the issue is coming from. So please advise how I can completely remove all the plugin’s data and I will see if that fixes the issue. Thanks.
@Chris, The plugin doesn’t cache any data. However, options are not automatically deleted when you remove it.
Could you advise what options are stored and where please, so I can delete them?
@Chris, In the latest release there is a button to deleted saved options.
I am sure my configuration is correct, but I keep getting this error!
2025-10-08 13:49:09 Connection: opening to ssl://smtp.ionos.co.uk:465, timeout=300, options=array()
2025-10-08 13:49:09 Connection: opened
2025-10-08 13:49:09 SMTP INBOUND: “220 kundenserver.de (mreue106) Nemesis ESMTP Service ready”
2025-10-08 13:49:09 SERVER -> CLIENT: 220 kundenserver.de (mreue106) Nemesis ESMTP Service ready
2025-10-08 13:49:09 CLIENT -> SERVER: EHLO northernquarterradio.co.uk
2025-10-08 13:49:09 SMTP INBOUND: “250-kundenserver.de Hello northernquarterradio.co.uk [82.165.89.32]”
2025-10-08 13:49:09 SMTP INBOUND: “250-8BITMIME”
2025-10-08 13:49:09 SMTP INBOUND: “250-AUTH PLAIN LOGIN”
2025-10-08 13:49:09 SMTP INBOUND: “250 SIZE 141557760”
2025-10-08 13:49:09 SERVER -> CLIENT: 250-kundenserver.de Hello northernquarterradio.co.uk [82.165.89.32]250-8BITMIME250-AUTH PLAIN LOGIN250 SIZE 141557760
2025-10-08 13:49:09 Auth method requested: UNSPECIFIED
2025-10-08 13:49:09 Auth methods available on the server: PLAIN,LOGIN
2025-10-08 13:49:09 Requested auth method not available:
2025-10-08 13:49:09 Auth method selected: LOGIN
2025-10-08 13:49:09 CLIENT -> SERVER: AUTH LOGIN
2025-10-08 13:49:09 SMTP INBOUND: “334 VXNlcm5hbWU6”
2025-10-08 13:49:09 SERVER -> CLIENT: 334 VXNlcm5hbWU6
2025-10-08 13:49:09 CLIENT -> SERVER: bnFyLmNvbnRhY3Rz
2025-10-08 13:49:09 SMTP INBOUND: “334 UGFzc3dvcmQ6”
2025-10-08 13:49:09 SERVER -> CLIENT: 334 UGFzc3dvcmQ6
2025-10-08 13:49:09 CLIENT -> SERVER: JGRlcHJlc3Mtc3RhZ2UtZGFuZGVyKA==
2025-10-08 13:49:09 SMTP INBOUND: “535 Authentication credentials invalid”
2025-10-08 13:49:09 SERVER -> CLIENT: 535 Authentication credentials invalid
2025-10-08 13:49:09 SMTP ERROR: Password command failed: 535 Authentication credentials invalid
SMTP Error: Could not authenticate.
2025-10-08 13:49:09 CLIENT -> SERVER: QUIT
2025-10-08 13:49:09 SMTP INBOUND: “221 kundenserver.de Service closing transmission channel”
2025-10-08 13:49:09 SERVER -> CLIENT: 221 kundenserver.de Service closing transmission channel
2025-10-08 13:49:09 Connection: closed
SMTP Error: Could not authenticate.
@Alan, Please use the username, password, from email supplied by your SMTP provider.